
Overview
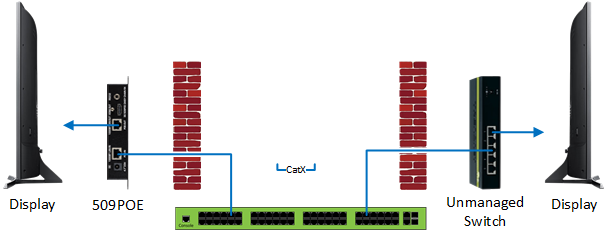
In situations where only a single network wire is available from the rack location to a display location, the same network cable that carries audio/video traffic to a Just Add Power Receiver can be used to carry data traffic to some devices at the display location. Additional network wires can be connected to a 509POE through the network output, or to an unmanaged network switch.
Capabilities
A Receiver port is capable of providing:
- Internet access - Smart TV features
- Direct IP control - the driver input must use the IP address for the display
A Receiver port is NOT capable of providing:
- "Discovery" connections - Sonos app, IP scanners, things that require the devices to be on the same subnet
- Wireless access points - These will work, but connected devices will be on the Just Add Power subnet and not have easy access to data network devices
- Control system interfaces - this may be possible, but it would need to be setup as if the interface is on a separate, routed network compared to the processor
The device connected to the loopout must have a Gigabit ethernet port to ensure full communication. 10/100M links may provide slower connections and intermittent connectivity.
A Transmitter port is NOT capable of providing data traffic to any devices. A Transmitter port can only be connected to a Transmitter.
Setup
- Connect the Receiver to a Receiver port on the switch (or to the unmanaged switch that leads back to a Receiver port)
- Connect the display-side device to the network output of the Receiver (or to the unmanaged switch)
- Assign a static IP to the display-side device according to the table below, or enable DHCP on a Receiver to have the IP assigned automatically. NOTE: For Direct IP Control, a static IP is required.
| JADConfig Class | First Receiver IP | Last Available IP | Device Netmask | Device Default Gateway |
|---|---|---|---|---|
| 10.x.x.x | 10.128.0.2 | 10.255.255.254 | 255.0.0.0 | 10.128.0.1 |
| 172.16.x.x | 172.16.128.2 | 172.16.255.254 | 255.255.0.0 | 172.16.128.1 |
| 192.168.100.x | 192.168.100.130 | 192.168.100.254 | 255.255.255.0 | 192.168.100.129 |
| 192.168.200.x | 192.168.200.130 | 192.168.200.254 | 255.255.255.0 | 192.168.200.129 |


