



Overview
Supported Netgear M4250 and M4350 Series switch firmware includes a built-in Just Add Power AV profile for configuring a multicast network used by an AMP Alternate Configuration system.
The profile applies Netgear-tested multicast settings for Just Add Power audio, video, and USB/KVM distribution. It is available through the switch webUI and current versions of the Netgear Engage Controller.
Important: The Just Add Power AV profile is intended only for AMP Alternate Configuration. Do not manually apply this profile to an AMP Standardized Configuration system. AMP configures and manages supported switches during the Standardized Configuration workflow.
Supported Switch Firmware
- Netgear M4250 Series:
v13.0.6.7or later - Netgear M4350 Series:
v14.0.9.10or later
If the Just Add Power AV profile is not listed in the switch webUI, confirm the switch model and update it to the required firmware version or later.
VLAN Routing Settings
The recommended VLAN routing settings for the Just Add Power AV profile are:
- VLAN IP Settings:
Static - Subnet Mask:
255.255.0.0 - Switch VLAN Interface IP:
172.17.255.254
When the profile is configured through the Netgear Engage Controller, Engage automatically populates these settings. When the profile is configured manually through the switch webUI, the installer must enable VLAN routing and enter the settings manually.
The Switch VLAN Interface IP serves as the Default Gateway for the Just Add Power Encoders and Decoders.
These settings may be changed when required by the network design. If either network value is changed, enter the updated Switch VLAN Interface IP as the Default Gateway and the updated Subnet Mask during the AMP Alternate Configuration workflow.
What the Profile Configures
The Just Add Power AV profile configures the Netgear switch with multicast settings designed for Just Add Power Encoders and Decoders, including:
- IGMP and multicast traffic management
- Jumbo Frame support required for Just Add Power multicast traffic
- Just Add Power device discovery traffic
- Audio, video, and USB/KVM distribution within the selected VLAN
- Identification of connected Just Add Power devices within the Netgear interface
The installer or network administrator remains responsible for:
- Selecting the VLAN ID
- Assigning the correct switchports to the profile
- Confirming the VLAN interface IP address and subnet
- Configuring inter-VLAN routing and firewall access
- Confirming sufficient bandwidth between switches
- Entering matching network information in AMP
Before You Begin
- Confirm the switch is running the required firmware version or later.
- Choose a dedicated and unused VLAN ID for the Just Add Power devices.
- Determine which ports will connect to:
- Just Add Power Encoders
- Just Add Power Decoders
- The computer running AMP
- Other switches, routers, or Layer-3 network devices
- Determine the VLAN interface IP address, subnet mask, and available static IP address range that will be entered in AMP.
See Single VLAN Multicast Switching (Omega, Ultra, and MaxColor Series) for the complete network requirements.
Configure the Just Add Power AV Profile
Configure Using the Switch webUI
- Open a web browser and enter the current IP address of the Netgear switch.
- Log in to the switch webUI.
- Go to Configure > Network Profiles.
- Locate the Just Add Power AV profile template.
- Click the gear icon beside the profile.

- Select the ports where the profile will apply:
- Untagged: Use for ports connected directly to Just Add Power Encoders, Decoders, and the AMP computer.
- Tagged: Use when the Just Add Power VLAN must traverse a trunk or uplink to another switch, router, or Layer-3 network device.
- Excluded: Use for ports that should not carry the Just Add Power VLAN.
- Enter a descriptive Profile Name.
- Enter the dedicated VLAN ID.
- Review the profile color and change it if desired.
- Enable Edit VLAN Routing / DHCP Server.
- Manually enter the following VLAN routing settings:
- VLAN IP Settings:
Static - VLAN IP Address (Switch VLAN Interface IP):
172.17.255.254 - Subnet Mask:
255.255.0.0 - DHCP Server:
Off
- VLAN IP Settings:
- Change these settings only when required by the project’s network design.
- Click Apply.
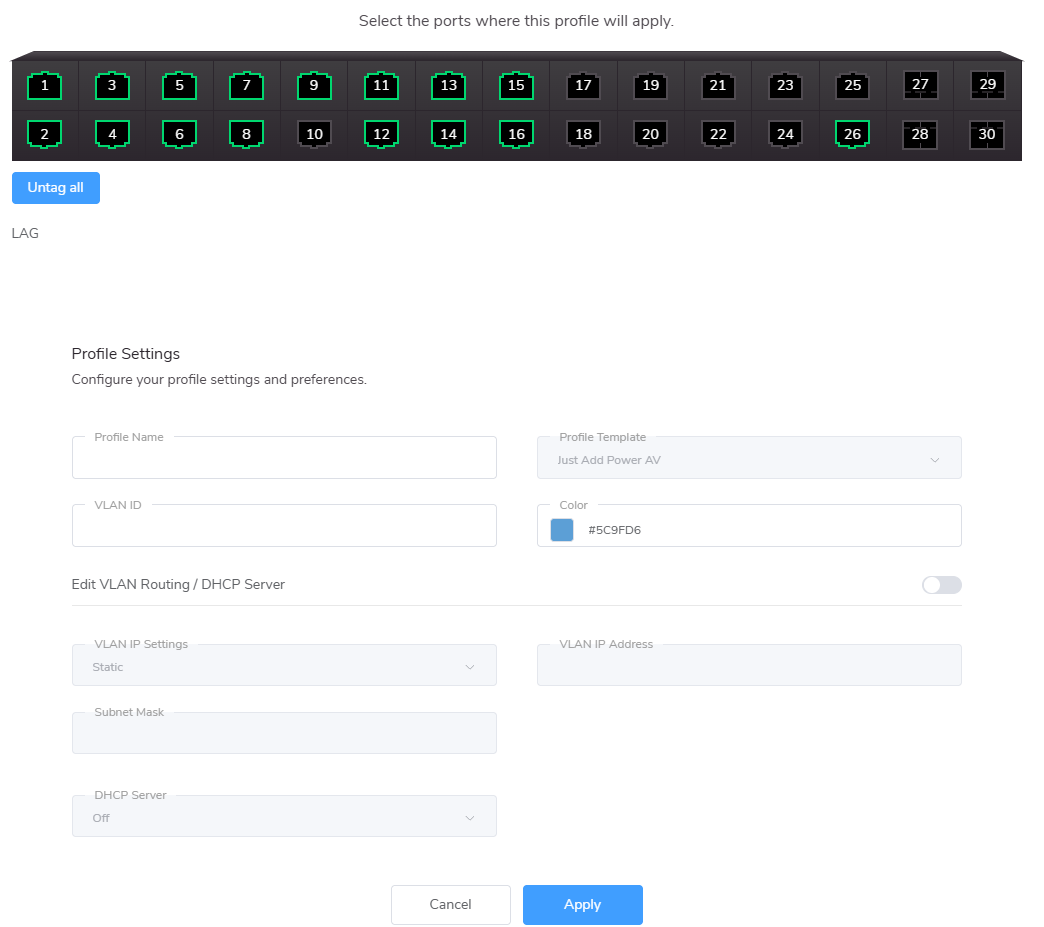
Manual webUI Configuration: The switch webUI does not automatically populate the VLAN routing settings. Confirm that each value has been entered before applying the profile.
Network Information Must Match: When the default settings are used, enter 172.17.255.254 as the Default Gateway and 255.255.0.0 as the Subnet Mask during the AMP Alternate Configuration workflow.
Configure Using the Netgear Engage Controller
Select the Just Add Power AV profile in the Netgear Engage Controller. Engage automatically populates the VLAN routing settings listed above.
The installer must still select the required VLAN ID and assign the appropriate untagged and tagged ports before saving the switch configuration.
If the automatically populated settings are changed in Engage, enter the updated Switch VLAN Interface IP as the Default Gateway and the updated Subnet Mask when configuring the Just Add Power devices with AMP.
Multi-Switch Systems
For systems using multiple switches:
- Use the same Just Add Power VLAN ID on every switch.
- Apply the profile to every port connected to a Just Add Power Encoder or Decoder.
- Carry the Just Add Power VLAN across every required switch uplink.
- Enable Jumbo Frames on all uplinks carrying Just Add Power traffic.
- Confirm the uplinks have sufficient bandwidth for the expected number of simultaneous streams.
- Configure only one active IGMP Querier for the Just Add Power VLAN.
Configure the Devices with AMP
When the default Just Add Power AV profile network settings are used, enter the following values in AMP:
- Default Gateway:
172.17.255.254 - Subnet Mask:
255.255.0.0
With the default settings, the Just Add Power devices use the 172.17.0.0/16 network. Assign each Encoder and Decoder a unique available IP address within this subnet.
Do not assign the network address 172.17.0.0, the switch VLAN interface IP 172.17.255.254, or the broadcast address 172.17.255.255 to a device.
- Connect each Just Add Power Encoder and Decoder to an untagged port assigned to the Just Add Power AV profile.
- Connect the computer running AMP to an untagged port assigned to the same profile.
- Open AMP and select Alternate Configuration.
- Enter the Default Gateway and Subnet Mask used by the Just Add Power VLAN.
- Discover and configure the Encoders and Decoders.
See Build a New System on an Existing Network with AMP Alternate Configuration for the complete device configuration workflow.
Verify the Configuration
- Confirm every Just Add Power port is assigned to the correct profile and VLAN.
- Confirm switch uplinks carry the Just Add Power VLAN where required.
- Confirm AMP discovers every connected Encoder and Decoder.
- Confirm each device receives the intended IP address, subnet mask, and default gateway.
- Confirm the Data Network can reach the Just Add Power device subnet through the required network route.
- Test audio, video, and USB/KVM switching between multiple Encoders and Decoders.

