



Overview
Image Pull provides a preview of the HDMI video being processed by a Just Add Power Encoder or Decoder. The preview can be viewed in the device webUI, opened directly in a web browser, or displayed within a control system interface.
Image Pull is also a useful troubleshooting tool. Comparing the preview from an Encoder with the preview from a Decoder can help determine whether a video issue originates at the source, within the network video path, or between the Decoder and display.
Applies To: 2G Series, Omega Series, Ultra Series, and MaxColor Series Encoders and Decoders.
Note: Available formats, webUI controls, and troubleshooting behavior vary by product series. Refer to the instructions for the appropriate series.
Before You Begin
- Identify the IP address of the Encoder or Decoder.
- Confirm that your PC or control system has network access to the device.
- Confirm that the device is running a supported firmware version:
- 2G Series: A5.21D or later
- Omega and Ultra Series: A6.1.10 or later A-series firmware, or any B-series firmware
- MaxColor Series: MAX v3.5.2 or later
For help accessing a device, refer to the appropriate article:
- How to Access the webUI for 2G Series Devices
- How to Access a Device for Omega, Ultra, and MaxColor Series
Note: The available Image Pull controls and webUI appearance may vary on devices running older firmware.
View Image Pull
Image Pull can be viewed using the device webUI or opened directly using an image URL. Omega, Ultra, and MaxColor Series devices provide Image Pull controls on the Video tab. The available controls vary by product series and firmware version.
2G Series
2G Series devices do not use the ImagePull cards shown in the Omega, Ultra, and MaxColor Series instructions below. Open the Image Pull snapshot directly using the device IP address:
http://[device-ip]/pull.bmpReplace [device-ip] with the IP address of the 2G Series Encoder or Decoder.
Note: Image Pull is disabled on boot by default on 2G Series devices. If the image is unavailable or does not update, configure Image Pull to start on boot or start it temporarily through Telnet.
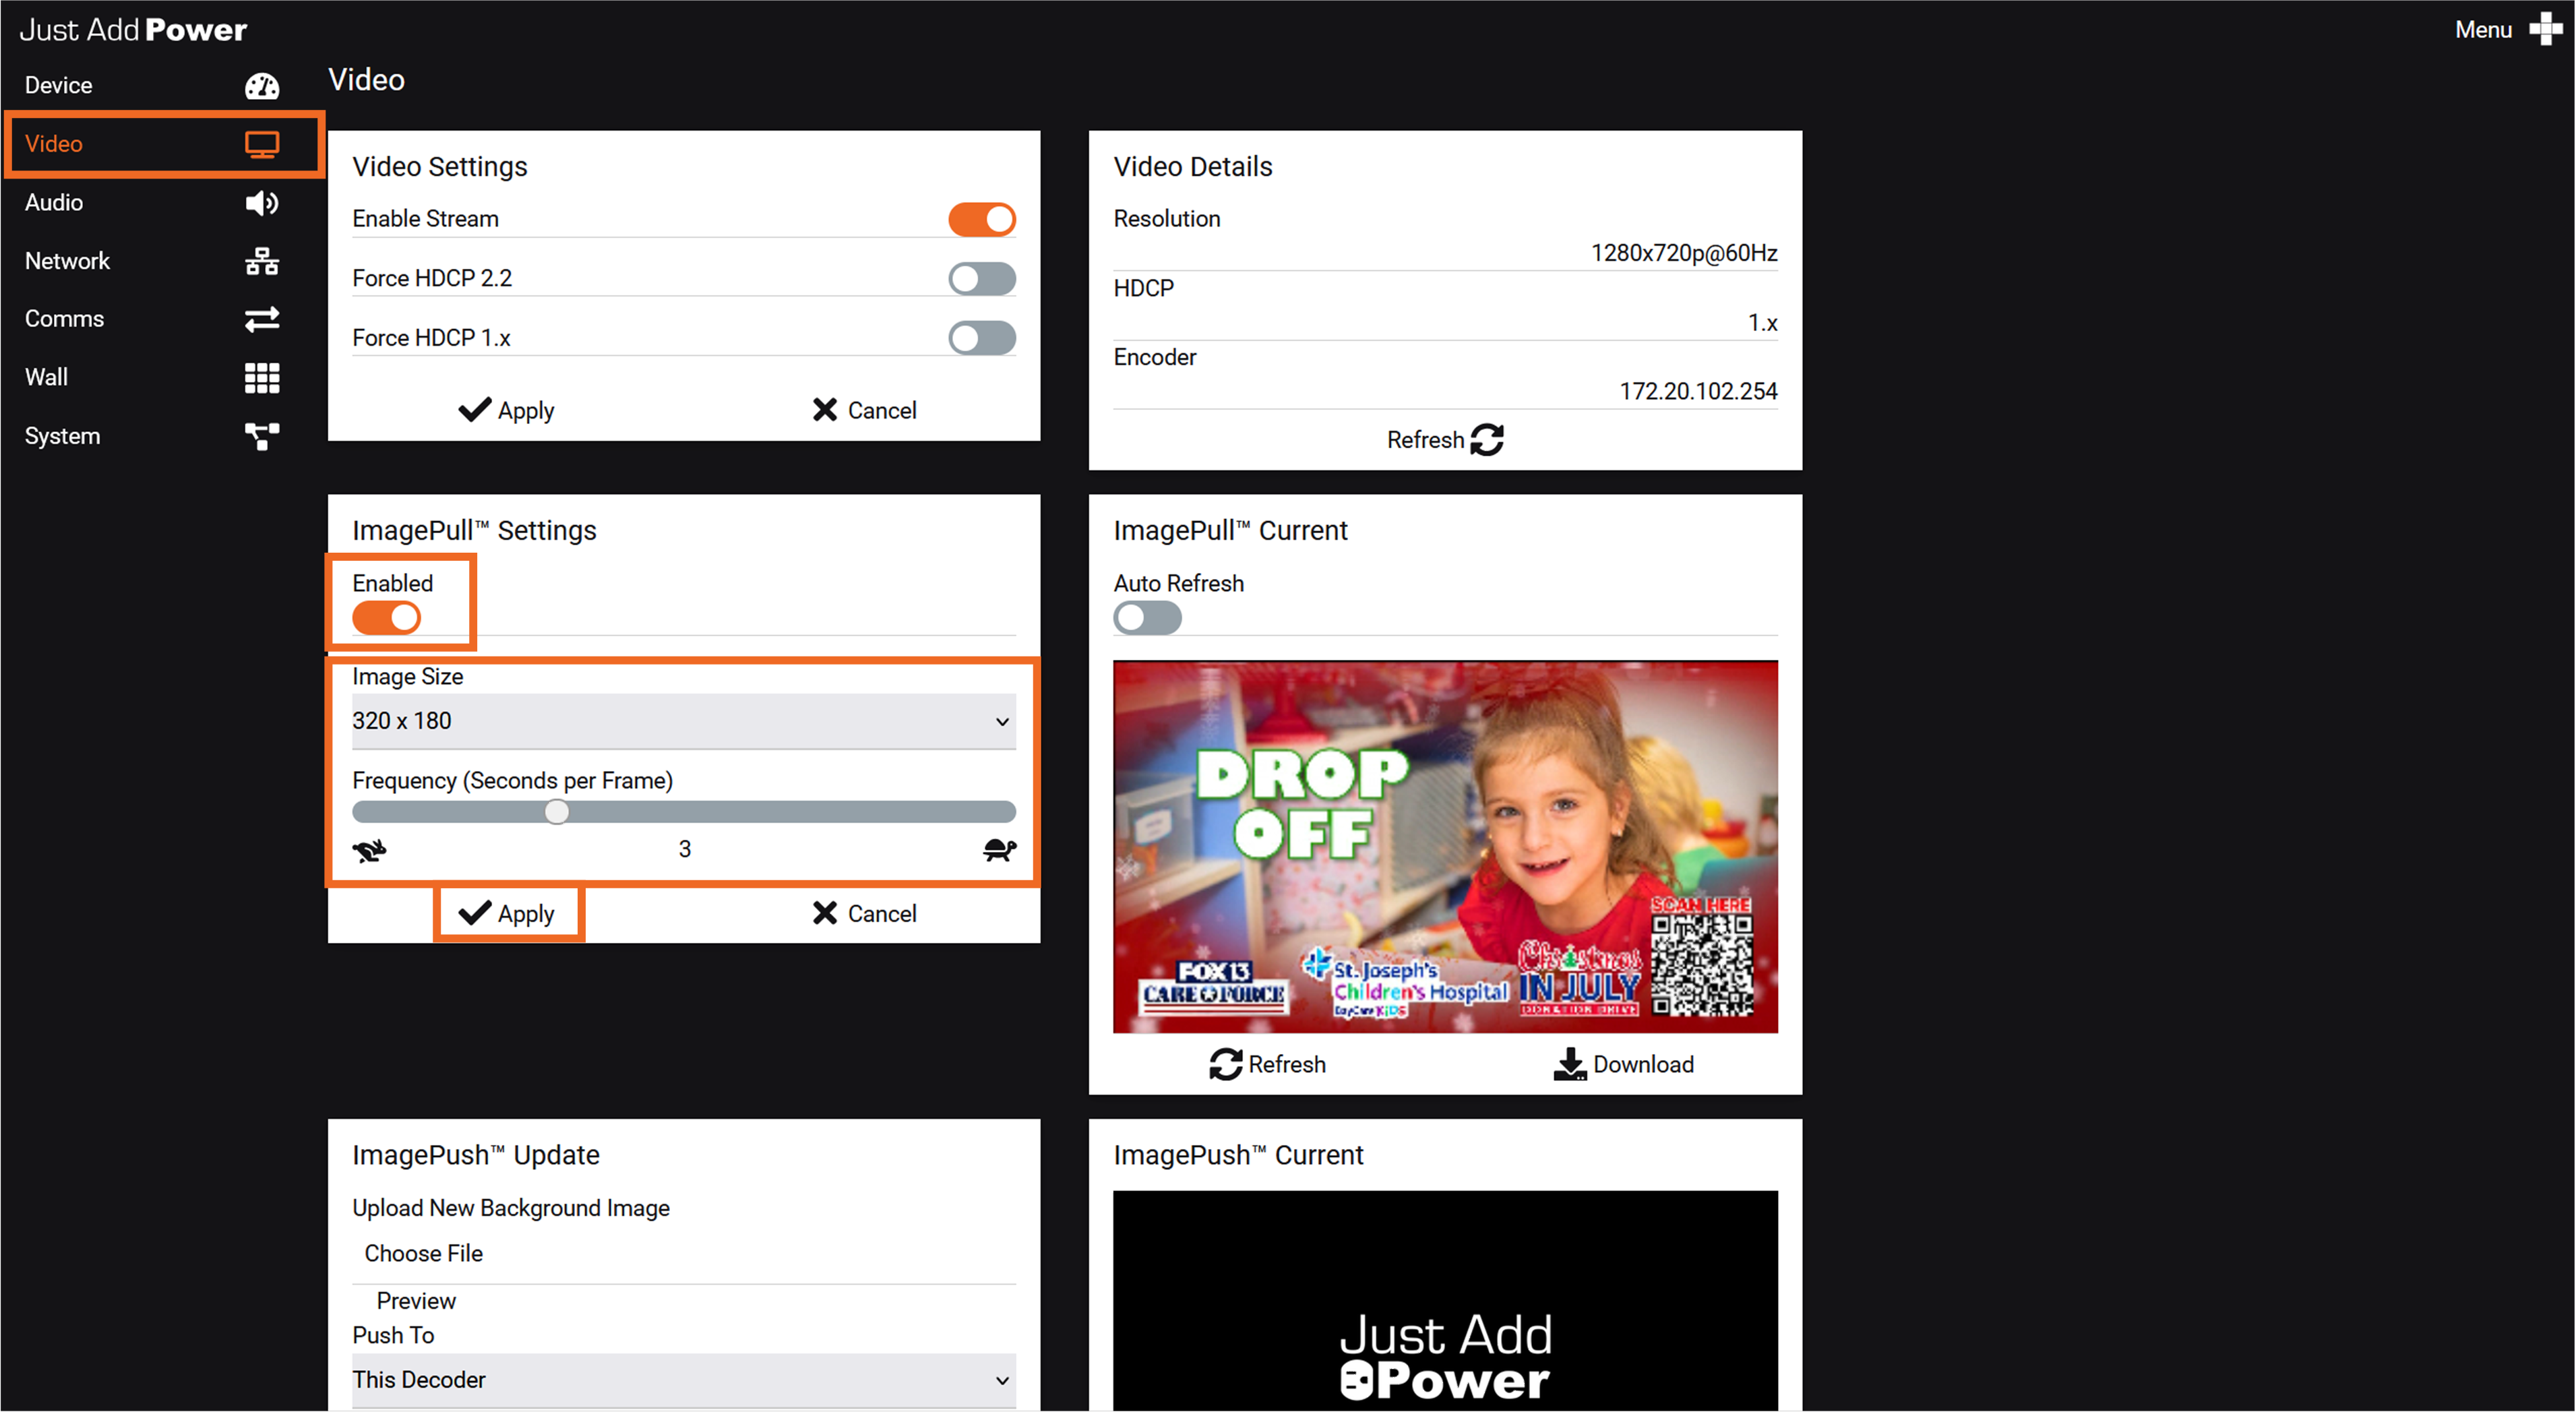
Omega and Ultra Series
- Open the webUI of the Encoder or Decoder.
- Select the Video tab.
- Locate the ImagePull Settings card.
- Turn on Enabled.
- Select the desired Image Size.
- Set the Frequency in seconds per frame.
- Select Apply.
The current preview appears in the ImagePull Current card.
- Enable Auto Refresh to update the preview automatically.
- Disable Auto Refresh and select Refresh to update the preview manually.
- Select Download to save the current Image Pull snapshot.
MaxColor Series
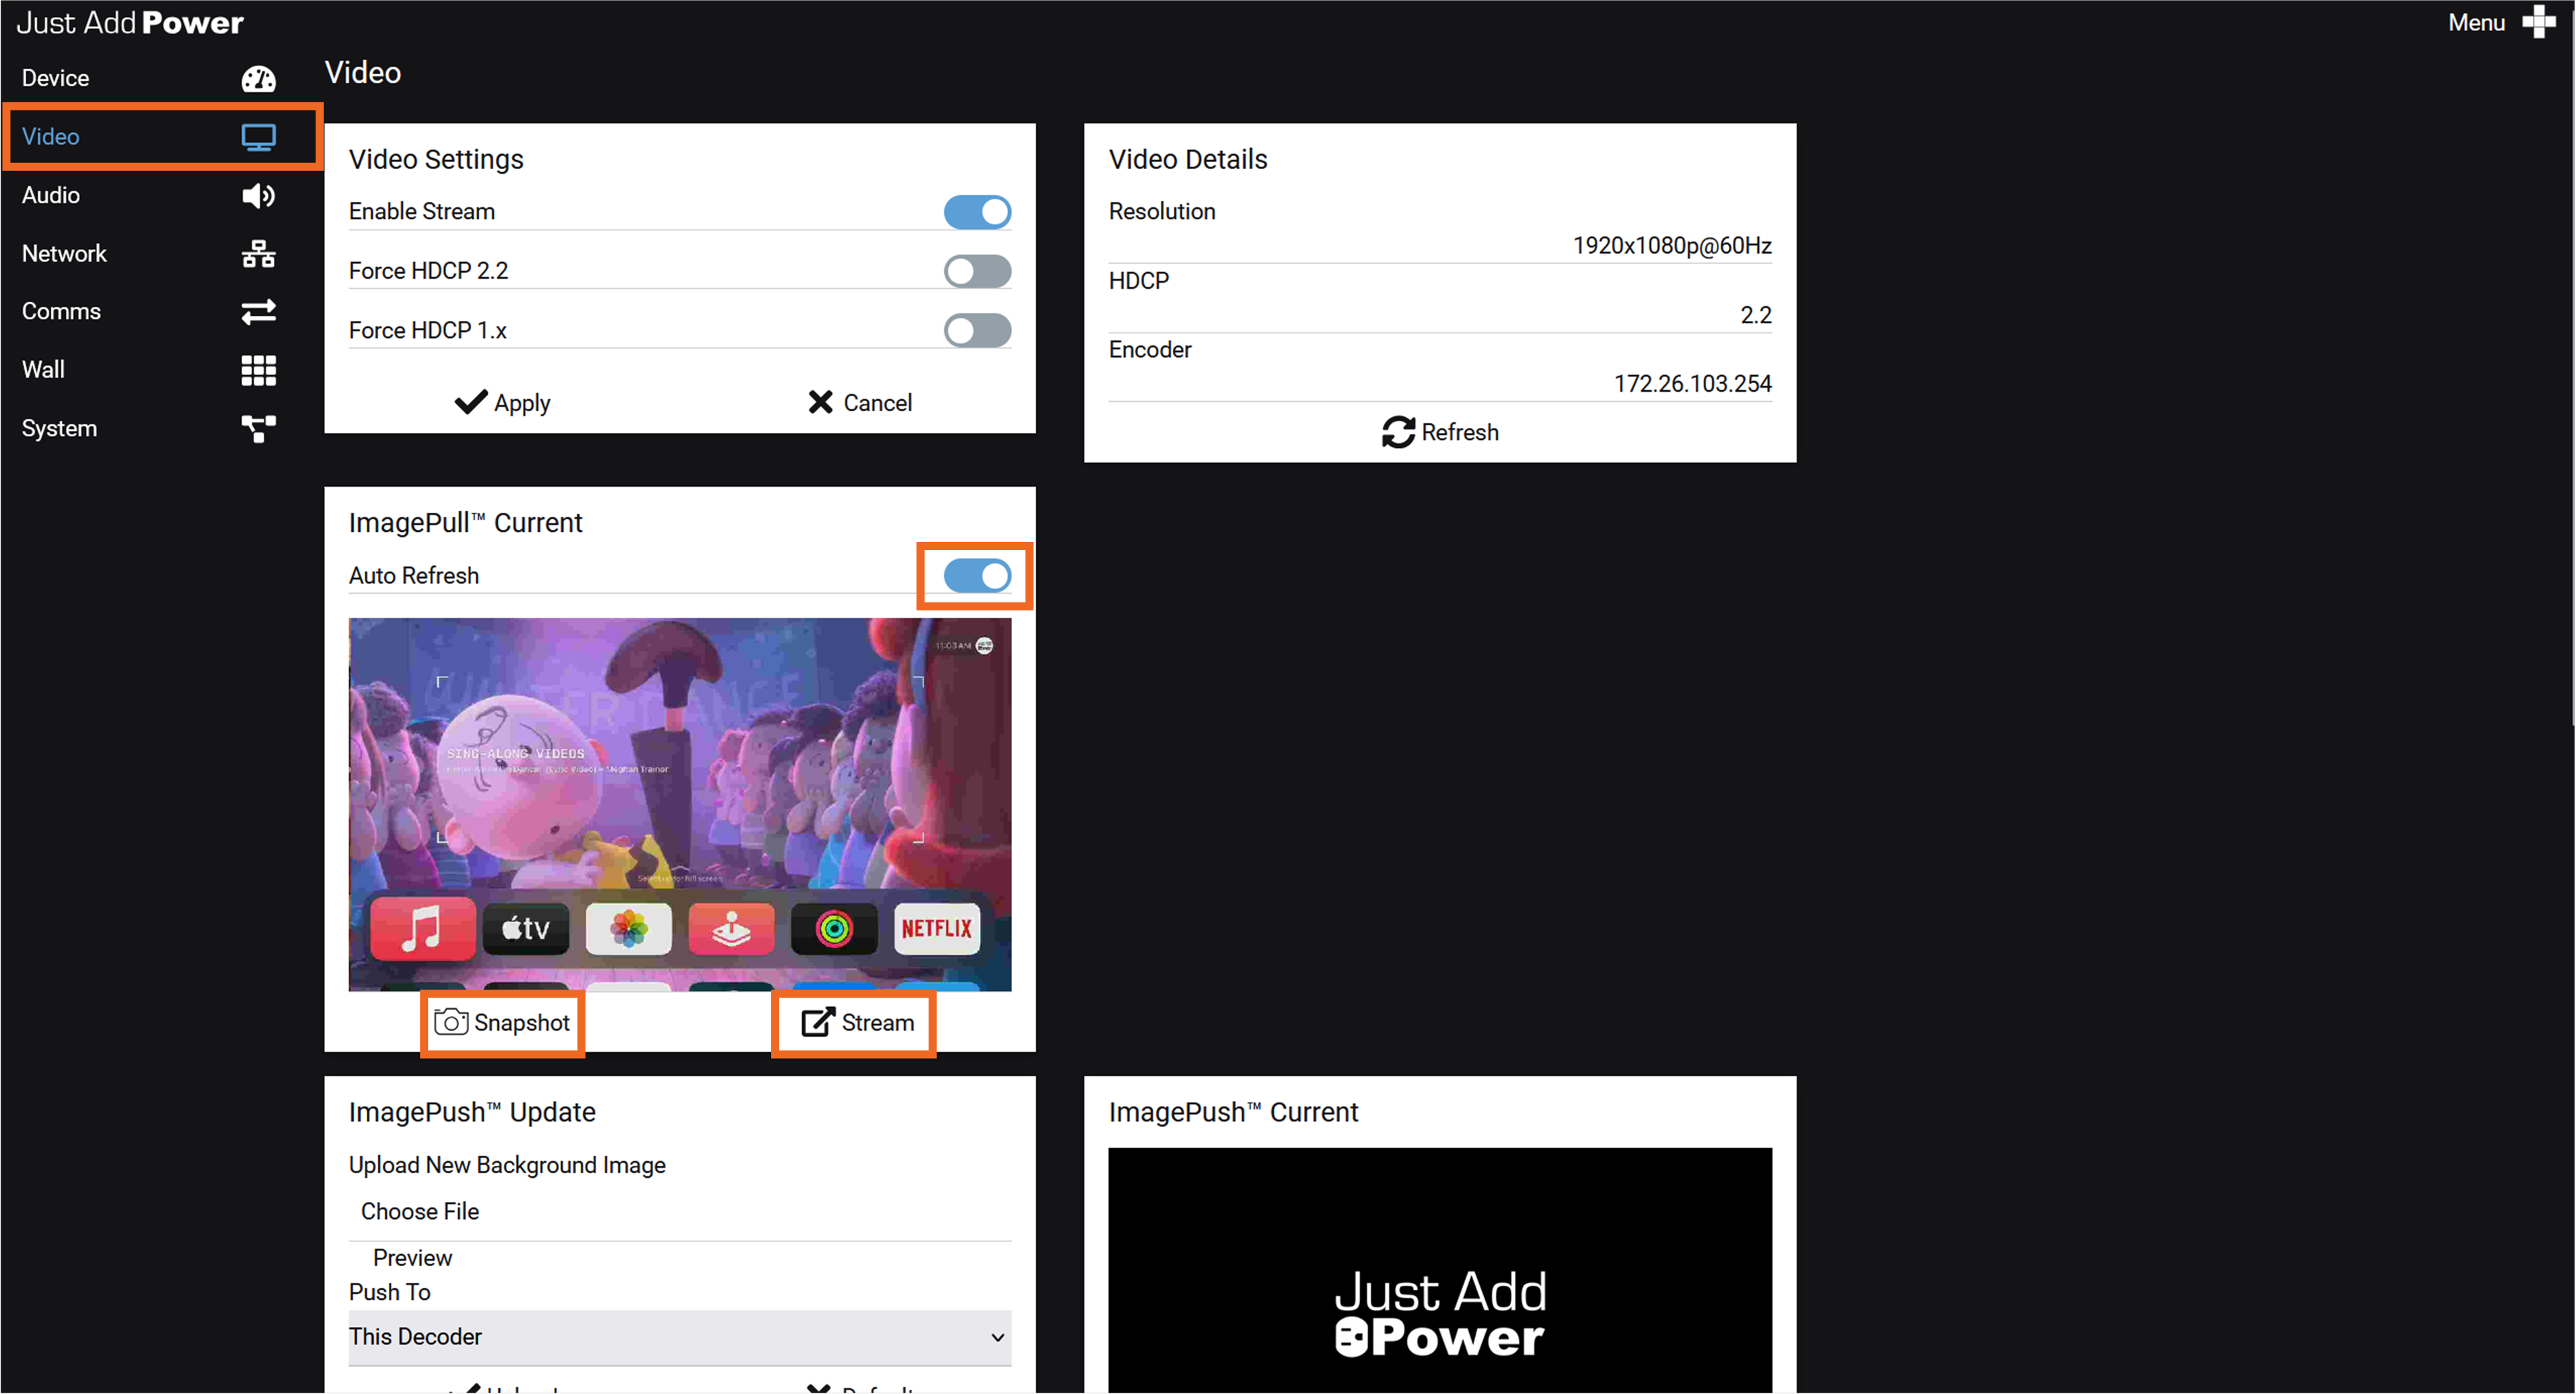
- Open the webUI of the Encoder or Decoder.
- Select the Video tab.
- Locate the ImagePull Current card.
- Enable Auto Refresh to update the preview automatically.
Two additional viewing options are available below the preview:
- Select Snapshot to open a single JPEG snapshot.
- Select Stream to open the MJPEG video stream.
Note: The MaxColor Series MJPEG video stream does not include audio.
Access Image Pull by URL
Image Pull can be opened directly in a web browser or incorporated into a control system interface. Replace [device-ip] with the IP address of the Encoder or Decoder.
| Product Series | Preview Type | Address |
|---|---|---|
| 2G, Omega, or Ultra Series | BMP Snapshot | http://[device-ip]/pull.bmp |
| 2G, Omega, or Ultra Series | Converted PNG Snapshot | http://[device-ip]/pull.png |
| MaxColor Series | JPEG Snapshot |
http://[device-ip]/pull.jpg |
| MaxColor Series | MJPEG Video Stream | http://[device-ip]:8080/?action=stream |
Examples
MaxColor Series JPEG snapshot:
http://172.27.1.1/pull.jpgMaxColor Series MJPEG video stream:
http://172.27.1.1:8080/?action=streamMaxColor MJPEG: For information about configuring the MJPEG resolution, frame rate, and bandwidth, refer to MaxColor Series Image Pull via MJPEG Network Video Stream.
Configure Image Pull
Image Pull settings determine the resolution, priority, and frequency of the captured image.
The available Image Pull configuration methods depend on the product series.
| Product Series | Native webUI Configuration | CLI in the webUI | Telnet |
|---|---|---|---|
| 2G Series | Not supported | Not supported | Supported |
| Omega and Ultra Series | Supported | Supported | Supported |
| MaxColor Series | Not supported | Supported | Supported |
MaxColor Series: The ImagePull Current card provides controls for viewing the snapshot and video stream but does not provide Image Pull configuration controls. Use Telnet or the CLI in the webUI to change Image Pull settings.
- Omega and Ultra Series: Use the ImagePull Settings card on the Video tab for standard configuration. Telnet or the CLI in the webUI can also be used.
- MaxColor Series: Use Telnet or the CLI in the webUI to change Image Pull settings. The ImagePull Current card displays the current preview but does not provide configuration controls.
- 2G Series: Use Telnet to change Image Pull settings.
Supported Image Sizes
| Product Series | Supported Snapshot Resolutions | CLI Size Value |
|---|---|---|
| 2G, Omega, and Ultra Series |
160 × 90 320 × 180 640 × 360 |
160320640
|
| MaxColor Series |
160 × 90 320 × 180 640 × 360 1280 × 720 1920 × 1080 |
16032064012801920
|
MaxColor Series: The 1280 × 720 and 1920 × 1080 snapshot resolutions must be configured through CLI settings. The 1920 × 1080 option applies to Image Pull snapshots and does not increase the resolution of the MJPEG video stream.
| Parameter | Description | Recommendation |
|---|---|---|
{$SIZE} |
Width value corresponding to one of the supported snapshot resolutions. | Use 320 for a 320 × 180 snapshot unless a different supported resolution is required. Larger snapshots may affect HDMI video performance. |
{$PRI} |
Image Pull process priority. Accepted values are 1 and 0. |
Use 1. A value of 0 may cause video stuttering. |
{$FREQ} |
Number of seconds between image captures. | Use 1 or higher. |
Start Image Pull on Boot
Use the following setting to start Image Pull automatically whenever the device boots:
astparam s pull_on_boot {$SIZE}_{$PRI}_{$FREQ}For example, the following commands configure a 320 × 180 snapshot captured every three seconds:
astparam s pull_on_boot 320_1_3
astparam save
sleep 1
reboot
The setting is saved to permanent memory and applied when the device reboots.
2G Series: Image Pull is disabled on boot by default. Saving a pull_on_boot value enables Image Pull whenever the device boots.
Disable Image Pull on Boot
Execute the following commands to prevent Image Pull from starting automatically:
astparam s pull_on_boot
astparam save
sleep 1
reboot
Temporary Commands
Temporary commands take effect immediately but do not change the saved pull_on_boot setting.
Start Image Pull
Execute the following command to start Image Pull:
start_image_pull {$SIZE} {$PRI} {$FREQ}Example:
start_image_pull 320 1 3Executing this command stops any previous Image Pull process and starts a new process using the specified parameters.
Important: When start_image_pull is executed through Telnet, the Telnet session must remain open. Closing the session stops the temporary Image Pull process and prevents the image from refreshing.
On 2G Series devices, execute start_image_pull only through Telnet. Executing this command through the webUI command interface may cause device instability.
Stop Image Pull
Execute the following command to stop the active Image Pull process:
stop_image_pullConvert BMP to PNG
2G, Omega, and Ultra Series devices create Image Pull snapshots in BMP format. Execute the following command to convert the current BMP image to PNG:
bmp2png -o /www/tmp.png /www/pull.bmp;mv /www/tmp.png /www/pull.pngThe converted image is available at:
http://[device-ip]/pull.pngNote: This command converts only the current BMP image. The PNG file does not update automatically when another BMP image is captured. Execute the conversion command again to update the PNG.
Troubleshooting
Image Pull can help identify where a video issue occurs within the signal path. Begin by viewing Image Pull from the Encoder, then compare it with Image Pull from the Decoder.
Encoder
On an Encoder, Image Pull captures the HDMI video after it enters the Encoder and before it is transmitted over the network.
- If Encoder Image Pull is clean, the source and Encoder HDMI input path are working. Continue troubleshooting the network, Decoder, and display side.
- If Encoder Image Pull shows the same issue as the display, troubleshoot the source, HDMI cable, EDID, HDCP, and Encoder HDMI input before evaluating the network or Decoder.
2G, Omega, and Ultra Series Decoder
On a 2G, Omega, or Ultra Series Decoder, Image Pull captures the decoded network video before it is sent through the HDMI output.
- If Decoder Image Pull is clean but the display is not, the Decoder is receiving and decoding the video correctly. Troubleshoot the Decoder HDMI output, HDMI cable, display input, EDID, and HDCP.
- If Decoder Image Pull shows the same issue as the display, the issue occurs before the Decoder HDMI output. Compare the result with Encoder Image Pull to determine whether the issue begins at the source or within the network video path.
| Encoder Image Pull | Decoder Image Pull | Investigate |
|---|---|---|
| Issue visible | Issue visible | Source, source HDMI cable, EDID, HDCP, or Encoder HDMI input |
| Clean | Issue visible | Network video path or Decoder processing |
| Clean | Clean, but the display has an issue | Decoder HDMI output, HDMI cable, display input, EDID, or HDCP |
MaxColor Series Decoder
MaxColor Decoder Image Pull behaves differently depending on whether an active HDMI display is connected.
When the Decoder is connected to an active display, Image Pull represents the HDMI output being sent to the display. It will generally show the same video as the display and cannot independently confirm the condition of the incoming network video.
To use MaxColor Decoder Image Pull to evaluate the network video:
- Disconnect the HDMI cable from the Decoder, or disconnect power from the display so that no active HDMI connection is present.
- Reboot the Decoder while no active HDMI connection is present.
- View Image Pull from the Decoder.
- If Decoder Image Pull is clean, the network video is reaching the Decoder correctly. Troubleshoot the Decoder HDMI output, HDMI cable, display input, EDID, and HDCP.
- If Decoder Image Pull shows the issue, compare it with Encoder Image Pull. A clean Encoder preview and incorrect Decoder preview indicate an issue within the network video path or Decoder processing.
Important: Disconnecting HDMI after the Decoder has booted may leave Image Pull in its previous operating state. Reboot the Decoder with no active HDMI connection before evaluating the network video.

